There are benefits to treating a tight/tender area with very precise pressure. One, you can sometimes only find the “That’s it!” spot with very precise pressure. Another is that very precise pressure is a more thorough treatment than a massage with less precision. Most clients appreciate thoroughness. If you’ve backed off very precise pressure because it hurts your body or it feels intimidating, here’s how to change that.
Precise Versus VERY Precise
In general, I use precise pressure to find areas of tender/tightness. I use a variety of body parts, from big (forearms and fists) to small (thumbs and fingers) to apply precise pressure.
I use VERY precise pressure to further examine the tender/tight area. However, I only use smaller body parts (thumbs, fingers, massage tools) to apply very-precise pressure.
While I’m examining the tender/tight area with very-precise pressure, I may find a spot within that area of pain that is more tender or is tighter than the rest of the pain area. (Clients sometimes shout out “That’s it!” when I hit it.) I then treat the “That’s it!” spot using very-precise pressure.
Here’s an example. Ali comes in with neck and shoulder pain. Using my knuckles around the scapula I find the locus of his pain area in his levator scapulae attachment (precise pressure).
Next I start examining the area of pain in the levator scapula attachment with my middle knuckle, looking for that exquisitely tender or tight spot (very-precise pressure).
What to Use to Find the “That’s It!” Spot
If it hurts your hands to work with very-precise pressure, I have three suggestions:
- Combine body parts.
- Stack and/or brace (support) body parts.
- Combine a massage tool with a body part.
Pictured below are my 3 favorite ways to deliver very-precise pressure.
Stacked Fingers/Thumbs
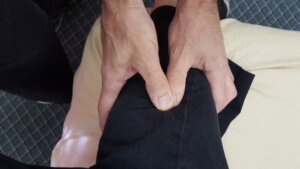
Try not to press. Instead lean into your fingers/thumbs. The bottom finger/thumb is the primary palpation vehicle.
Knuckle-Thumb
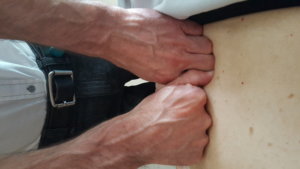
In this picture I’m directing my pressure into the middle finger of my left hand. You’ll notice that my right thumb is bent to fit in comfortably next to my left middle knuckle. This is not a mistake. In this case, my thumb’s primary role is for palpation, not for delivering pressure. My right thumb’s companion four fingers form a loose fist. They take most of the weight that I put on that hand, not my thumb.
Tool-Thumb
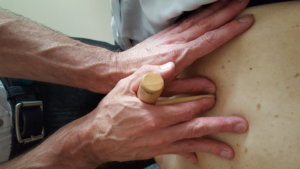
In this picture my thumb is a support, guide and the primary sensing instrument. I’m directing most of my “leaning” pressure into the tool, not my thumb.
How to Find the Spots
The way I find the tight and tender spots within the area of pain is by creating contrast. I can create contrast by the direction, length and speed of my palpating stroke.
When I’m palpating Ali’s levator scapulae attachment, I start by going across the grain of the muscle to give me enough distance to “flip” over a potential tight spot. My stroke is going to be fast enough and long enough so that I can feel the full shape of the tight/tender area. If I’m still having trouble feeling anything, I’m going to press deeper as I do the faster, longer stroke.
Going Very Precise
Once I find the tender/tight spots, I’m going to systematically investigate the areas using combined body parts, stacked/braced body parts or a massage tool and finger/thumb combination.
Next I’m going to use very precise pressure to work hyper-tender or hyper-tight spots within the pain area.
When applying very precise pressure I usually 1. press, 2. press and pull or 3. press and reciprocate. A massage tool combined with finger or thumb is insanely precise. In this video, I demonstrate how to press, press and pull, and press and reciprocate using a massage tool: T-Bar and L-bar: 3 Ways to Work Muscles Video.
Also, I like to work the pain area and the “That’s it!” spot from different angles. Lots of my clients love this.
Too Much
When you’re doing very-precise pressure, you run the risk of overworking the area. I usually can avoid this by revisiting the area instead of spending a long period of time there.
I also use a pain scale system approach when I’m unsure of the therapeutic pressure that I should be using. Here’s a quick video tutorial: Pain Scale System Video.
Lastly, I check in with the client to see how she’s feeling about the area I’m working on.
Checking in is not foolproof. The client may not have a mental gauge as to what feels like good pain and what feels like bad pain. When in doubt, move off—unless the client knows exactly what works for her.
Making Very Precise Happen
Here’s the short version for working with very precise pressure:
- Find the pain/tight area by creating contrast.
You can create contrast by making your exploratory stroke longer and faster than you normally would. If you need more contrast, press deeper as you do your exploratory strokes.
- Choose a body part combination that doesn’t cause you pain when you’re pressing.
My favorites are 1. Stacked thumbs, 2. Knuckle and thumb, 3. Massage tool and thumb.
- Systematically work the pain area and the “That’s it!” spot (if there is one) by pressing, pressing and pulling or pressing and reciprocating.
Being very precise can help your client with her pain condition and doesn’t have to cause you pain.
Massage Tools Online CEU Course
If you want to be able to use a massage tool with every massage so that you can save your hands and deliver focused, precise pressure like nobody else can, this online course will get you there.
I taught it live for many years and now I’ve made the online version, There are lots of videos and if you have any questions while you’re taking the course, you can always ask me (mark@makethemostofmassage.com).
Check it our here: How to Use Massage Tools (Fearlessly and Effectively).

Comments on this entry are closed.